Tuesday, May 31, 2016

My three Ladies...

Hi guys!

I really started to paint when my husband told me to quit sketching and drawing tiny things, I was not really working (looking after my baby boy and pregnant with our second...) so I actually had the time to work on much bigger scale.
After taking me to this very nice artshop in Barcelona, I was equipped to start on my very first huge canvas!

I decided to work from a watercolor of mine, this one,


I knew that I wanted to do something with a cubism feel, wasn't sure how to make it happened though, I am a big fan of Picasso, Braques,...

*here is a painting of Picasso, the woman with a guitar (ma jolie) 1911-12, that I really love, I took this picture at the MOMA in our last trip to New York City.
and after taking a closer look on their work, I had an idea, I decided to make 2 copies of my watercolor and try to recompose a picture with those, which gave me this...


...but it was clearly not enough but I liked it so I just kept it!

Then I made a further 4 copies of my initial watercolor, and cut them in little pieces (kind of triangular, square, rectangular shapes for the background and just cut through the body of the woman following the lines that I thought were strong) I still wanted to recognize the subject, it was my first one and I didn't want to go too far, I was not very confident at that point!!! I decided not to discourage myself with too much difficulties!

Anyway, there is the result of the collage...


I was kind of happy of the result, I like the fact there were three women (I have 2 sisters), I just thought a few things would have to go for the ''masterpiece'', after sketching on the canvas the big lines, the elements that did not have their place kind naturally disappeared, I went with the colors of my watercolor maybe a little bit brighter, more beige... I really enjoyed myself doing it, and it gave me a surprising pleasure to paint on such big scale, i really recommend it!!! But enough talking, let's see the result...


Hearts have been kind of a mark for me so instead of the mouths, I used red hot hearts, I wish I could show you closer details but I actually sold this painting last year in South Africa. I was not going to sell it but this person felt literally in love with it, and after I brought the painting in his villa, I felt like the painting belong there, it was the perfect place for it. Strange feeling though to let it go, it was my first sell, I adore it but I don't really miss it,  I know my painting is in great loving hands.

My three ladies, 2005...

Miss Drey

Souvenir, souvenir: Kandinsky style carnival costume for the preschoolers...

Hi guys!

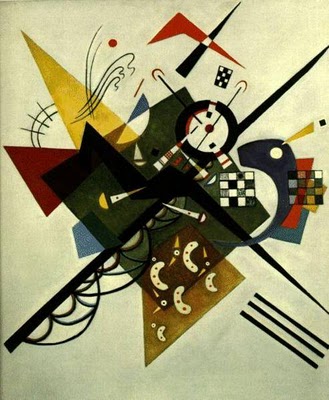
 I have been really busy with the preparation of the carnival at Matilda's school, the teacher asked if any parent would help, and of course I jumped on it!!! What a pleasure when I heard that the theme was "famous painters", so for Matilda's class (pre 2) I decided to go with Kandinsky, one of my favorite painter.


After the teacher made a nice presentation of Wassily Kandinsky to the kids, she pulled up posters and pictures of his work in the classroom. We were set to start on our project...

Basically, I had the idea of making a "tunique" and a hat for each kid, based on those paintings,
Color Study by Wassily Kandinsky. For the"tuniques"...
Point and Line LEVEL by Wassily Kandinsky. For the "hats"...


So it will give us something like that...


The biggest challenge we are facing is the number of kids in Matilda class, 30! We needed to have different activities going on at the same time, for them to not get bored! The tunique is made of 24 cardboard squares that they have to paint and glitter and another 24 paper squares that they will decorate and then glue on the cardboard squares.

Activity 1-
After cutting 720 cardboard squares (8cmx8cm) that was fun!!!, I had the kids painting them in the color of their choice, and sprinkle glitters on them before the paint got dry. 


1, 2, 3, ...461, 462, ...718, 719 and 720 cardboard squares!!! 
the kids painting their squares...
Even the tables at the end were pieces of art!!!
Activity 2-
Wassily Kandinsky used to be a musicien as well as a painter so I came up with an activity where music would be involved, basically, I was playing different kind of music tracks and the kids would translate what they feel  drawing with wax crayons on their paper squares. This workshop is really fun, and the children won't forget this experience, I assure you!!!

I spread the crayons all over the table, the children need to reach the color with ease during the activity. 
A view of some work done by the kids...
and more... I played some hip hop, classical, jazz, techno, hard core, african music... You need lots of different kind of rythmes to make this activity really fun !
Activity 3-
For this activity, I cut little shapes out of paper that I painted with acrylic (very important to use acrylic for the following) The kids had to create a little composition with those shapes within the paper square just using white glue.

Be sure to use Acrylic paint when you prepare your shapes, acrylic becomes waterproof when dry so the glue won't mess up the colors.  
Activity 4-
For the hat, I decided to use polystyrene forms, the kids had to paint them and once dry, draw some lines, shapes... on them with wax crayons.

We had over 120 shapes to paint...
Matilda in action...
Matilda after!!
Our shapes drying and...
getting customized...
Activity 4-
I used flat colored toothpicks, so it was easy for the kids to insert them in the polystyrene shapes and interconnect them to make their ''hat/sculpture''. Then I sharpened some colored kebab sticks that we plant into the polystyrene shape for some ''lines'', and to finish the kids cut some thin black plastic tube that they glue on their hat/work. The hats will stay up on their heads just by adding an elastic.


Et voilà! just put an elastic to secure it on top of the kid's head...
The kid's part is actually done, it took 6 school days for the 30 kids to prepare all the squares and finish their hats.

The teacher's assistant punched holes in the 4 corners of each cardboard squares...

That makes 2880 holes! Use the shapes hole puncher, you will end with nice confetti!!!
I glued all the paper squares onto the cardboard squares...


They look amazing next to each others!...
By piles of 24 squares...
And then I assembled 60 times, 12 squares together with black plastic tubes.

over 80 meters of plastic tube...
and lot of knots...
this is the way I assembled the squares,...
then I just stapled the straps with a strong paper .

Here are all the tuniques next to each others before I stapled the paper straps...


Waoow!!!!

Here's my baby's work!!!

The school later on organized a little exhibition with the kids costumes, I was more than happy to come help again! we had to find a cool way to showcase their work, with little space, I managed to make a suspension with all their hats and arranged in a fun way their tunics.It was so fun to see the little ones again!!


Love, Miss Drey

Monday, May 30, 2016

Super Refreshing Homemade Lemonade Recipes... with Lemons, Limes and/or Strawberries...

Hi Lil'Guys!

This is one of our favorite drink, our delicious and refreshing lemonade , a cypriot recipe that we got from Mr Z. (Maltilda's godfather who is from Cyprus). 

Under a hot weather, this drink is divine, perfect for picnic, great for summer parties...

We store our lemon concentrate in a glass bottles that I close with a cute piece of fabric and an elastic, then Matilda got the habit to customize them with her beautiful drawing. 

Those makes beautiful gifts for mother's or father's days, or to sale at a school fundraising events...


Here is the recipe:

You will need:
-2 kilos of Lemons
-A pack of caster Sugar
-A clean Cloth
-2 Bowls
-A Wooden Spoon
-A Bottle

To serve:
-A jar
-Ice Cubes
-Water
-Mint (optional)


Squeeze the juice of all the lemons.


Pass the juice trough the cloth to have a juice, free of pulp, clear as possible.

Then you will need to mesure how many cups of juice you get, and it will be the amount of cups of sugar you will add to your lemon juice - Usually I end up with 2 cups and an half of lemon juice, so I will add 2 cups and an half of sugar.

Mix until the sugar is completely dissolved with a wooden spoon.

Your concentrate is ready to bottle...


To serve it:

Pour some of your concentrate in a jar, lots of ice cubes, some fresh mint leaves, and fill up the jar with the water. 
Add more concentrate to sweeten your lemonade. Add more water if your lemonade is too sweet.
You can add also some fresh slices of cucumber or a couple of raspberries or piece of melon... It looks amazing and very fancy on a party table!

a jar of our delicious homemade lemonade!
But now we love to vary the pleasures, sometimes instead of using all lemons, we would use half amount of lemons and the other half, limes. Woww! this mix hit another level of deliciousness!!!!


An other one we tried was 1 kilo of lemons, 1 kilo of limes and 1 kilo of strawberries ( we would pass the strawberries in a juicer, to get all the juice et non of the seeds) This one is just insanely good!!


Give them a try, you won't be disappointed!!!

See you!!!
Drey